博客搭建 Blog Deployment:Hugo+Github+Vercel

Table of Contents
先展示几个博客的 Demo:
最近心潮澎湃,想自己搭建一个自己的个人主页,于是搜集了些资料,开始行动。
大部分博客建站的域名需要修改申请,尝试了一些平台最后选择了HUGO+Github的部署形式,下文也提供了在Vercel上部署的说明(vercel 支持个人博客免费部署)。
HUGO 环境的本地安装 #
对于不需要本地调试的话,可以不安装本地环境(Maybe )
安装依赖 HUGO #
这里我选择的模板是只支持Hugo Extended,不同的模板可能不同,可以先去HUGO 主题网站选择一个中意的模板再进行搭建。
- Hugo Extended v0.144+ -在Linux环境用终端命令进行安装,以下命令只需要选择一个即可:
## HUGO
# 安装标准版本
sudo apt install hugo
# To build the extended edition:
CGO_ENABLED=1 go install -tags extended github.com/gohugoio/hugo@latest
# To install the extended edition of Hugo:
sudo snap install hugo
也可以再github找到安装压缩包,进行手动安装。
Hugo安装过程可能遇到的问题 #
之前是直接apt install用的debian仓库版本,但太老了,还一直停在0.111.3版本,而且apt安装还会附带一大堆其它包,提示需要几百MB的存储空间,所以这次放弃apt,直接到github仓库下载二进制安装包。
github指路:https://github.com/gohugoio/hugo/releases
下载对应系统、对应硬件架构的版本,然后添加环境变量。
- windows:把压缩包解压到
D:\hugo并把路径添加到环境变量,高级系统设置—>环境变量—>系统变量—>path,保存退出。 - linux:把压缩包解压到
/opt/hugo并把路径添加到.bashrc,在末尾加一行export PATH=$PATH:/opt/hugo,然后source ~/.bashrc让变更生效。 配置完以后,敲命令hugo -h看是否正常输出。
安装依赖 Node #
网络不稳定的话,同样可以下载压缩包进行本地安装。
## Node
# Download and install nvm:
curl -o- https://raw.githubusercontent.com/nvm-sh/nvm/v0.40.2/install.sh | bash
# in lieu of restarting the shell
\. "$HOME/.nvm/nvm.sh"
# Download and install Node.js:
nvm install 22
# Verify the Node.js version:
node -v # Should print "v22.14.0".
nvm current # Should print "v22.14.0".
# Verify npm version:
npm -v # Should print "10.9.2".
安装依赖 Go #
Hugo中会涉及go语言,所以要安装依赖。
## go
# 1.**Remove any previous Go installation**
rm -rf /usr/local/go && tar -C /usr/local -xzf go1.24.2.linux-amd64.tar.gz
# 2.Add /usr/local/go/bin to the `PATH` environment variable
export PATH=$PATH:/usr/local/go/bin
# 3.Verify that you've installed Go
 go version
Theme Page 的选择 #
这里用Congo做示范,这个模板比较适合喜欢深度探索的朋友,如果想下载即用,可以选择后边给出的几个推荐的博客模板。
Congo 主题 #
jpanther/congo: A powerful, lightweight theme for Hugo built with Tailwind CSS.
初始化 #
### Create a new site, <mywebsite-name> is your site name
hugo new site mywebsite_name

cd mywebsite_name

git init

git submodule add -b stable https://github.com/jpanther/congo.git themes/congo
配置你的 hugo site #
新建config/_default文件夹,可以添加各种 toml 配置文件,可以从模板中直接拷贝,详细的DIY可参见模板网站。
config/_default/
├─ hugo.toml
├─ languages.en.toml
├─ markup.toml
├─ menus.toml
└─ params.toml
新建content文件夹,以下便是你博客的内容,使用md格式撰写,主目录下的index是你的主页,content的第一个子文件需要和配置文件menus.toml中的pageRef相对应。
└── content
    └── posts
        ├── _index.md
        └── first-post
            ├── cover.jpg
            ├── index.md
            └── thumb.jpg
目前为止,网站就具备了雏形,后边可以按照网站的模板教程,一步一步高阶配置。
本地调试 #
## Install dependencies
cd themes/congo
npm install

### Run the Tailwind compiler
cd ../..
./themes/congo/node_modules/tailwindcss/lib/cli.js -c ./themes/congo/tailwind.config.js -i ./themes/congo/assets/css/main.css -o ./assets/css/compiled/main.css --jit
To fully complete this solution, you can simplify this whole process by adding aliases for these commands, or do what I do and add a package.json to the root of your project which contains the necessary scripts.
{
  "name": "my-website",
  "version": "1.0.0",
  "description": "",
  "scripts": {
    "server": "hugo server -b http://localhost -p 8000",
    "dev": "NODE_ENV=development ./themes/congo/node_modules/tailwindcss/lib/cli.js -c ./themes/congo/tailwind.config.js -i ./themes/congo/assets/css/main.css -o ./assets/css/compiled/main.css --jit -w",
    "build": "NODE_ENV=production ./themes/congo/node_modules/tailwindcss/lib/cli.js -c ./themes/congo/tailwind.config.js -i ./themes/congo/assets/css/main.css -o ./assets/css/compiled/main.css --jit"
  }
}
Now when you want to work on designing your site, you can invoke npm run dev and the compiler will run in watch mode. When you’re ready to deploy, run npm run build and you’ll get a clean Tailwind CSS build.
or by hugo server to built all project.
注:因为hugo v0.146.5 目前有些bug,暂时不能本地调试。
Error: html/template:_shortcodes/figure.html:2:14: no such template "_internal/shortcodes/figure.html"
Hugoplate 主题 #
hugoplate: Hugoplate is a free starter template built
###  Project Setup
npm run project-setup
###  Install Dependencies
npm install
###  Development Command
npm run dev
coreychiu-portfolio-template 主题 #
iAmCorey/coreychiu-portfolio-template: portfolio template by corey chiu
# 安装pnpm
npm install -g pnpm
# 安装pnpm 依赖
npm install
# 部署
pnpm dev
在线部署 #
本地调试编辑完之后将项目push到github仓库。
使用 Github 部署 #
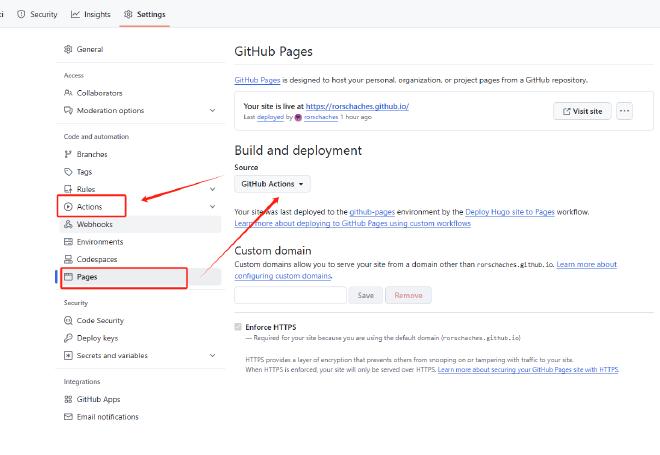
在建立仓库的settings页面选择page,将Build and deployment 下的 source 改成 github actions

这时下方应该会出现action的类型,选择hugo的workflow,添加yml文件。
然后点击action设置你的action,可以不设置,选择默认。
在最顶端导航栏的action菜单中即可看到你的个人主页部署列表。
使用 Vercel 部署 #
https://vercel.com 使用github账号登陆
- 点击New Project,选择你的代码仓库(支持GitHub、GitLab、本地文件或新建模板)。
- 选择仓库中的项目目录进行部署。
